16.3. Example: Creating a Test Case for Arithmetic1 | ||
|---|---|---|
 | Chapter 16. Using the TestCenter |  |
16.3. Example: Creating a Test Case for Arithmetic1 | ||
|---|---|---|
| | Chapter 16. Using the TestCenter | |
The module Arithmetic1 performs arithmetic operations on an image. The output is the processed image according to the selected function and constant.
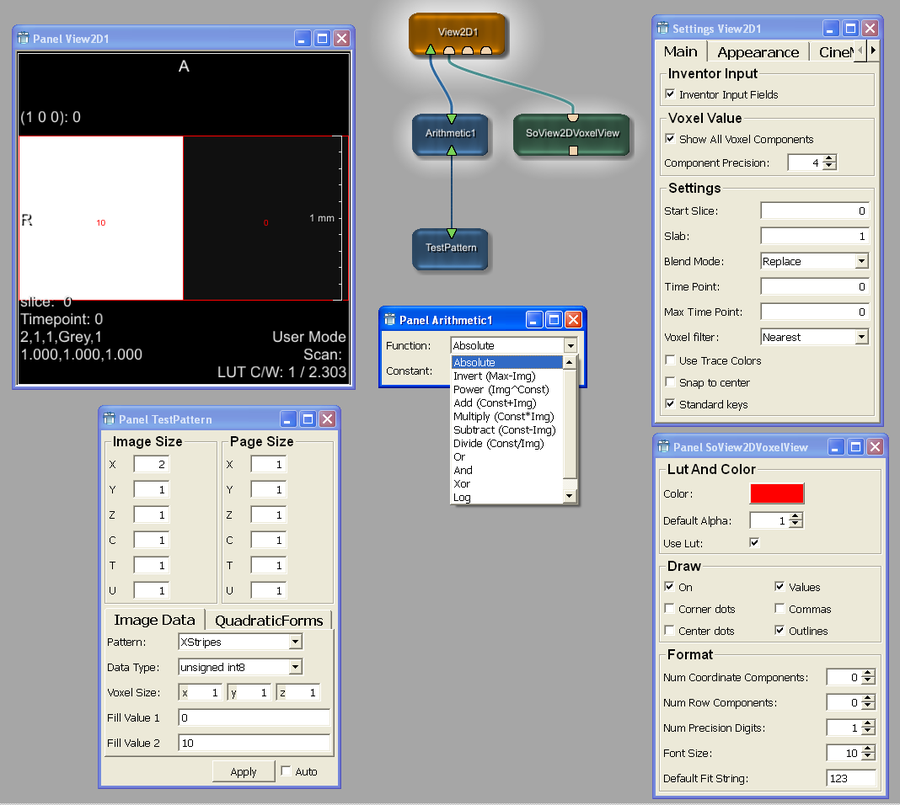
In the TestCaseManager, tab Test Creation, create a test case called “MyArithmetic1Test” with an empty network.
Click Show Network and create a network with a simple input image, for example TestPattern, connect it to Arithmetic1 and connect a View2D to its output. Open the viewer of View2D to see the resulting image.
For the testpattern image, set the following:
A small image size, for example 2x1x1.
A small page size, for example 1x1x1.
Fill values that are easy to calculate, for example “0” and “10”.
As pattern, select XStripes or Page Checker. This way, there will be two voxels with the two different fill values.
To make the pixel values more visible,
open the View2D settings and set the Voxel Filter to “nearest”. This will remove the linear extrapolation that is confusing in our test image. (Alternatively, press the multiply key X on the Num keypad.)
connect a SoView2DVoxelView module to the first or second Inventor connector of View2D, check Values and Outlines, and set Default Alpha to “1”. Choose a color that is easy to see on black and white, for example red. This will draw an outline around the pixel area and display the voxel value in its middle.
To get a feeling for the module to be tested, read the module help and manually test its functionalities in the context of the testing network. Try to form logical tests of single functionalities or in combinations that make sense (e.g., testing a constant alone makes no sense). Write the tests down to keep track and check that all features of the modules are covered in the test.
For Arithmetic1 it is very easy to identify these tests, as the module comes with a limited number of math functions. For each one, you can create a test.
Two things to take into account for the tests:
Constants: For some math functions, constants have to be included that need to have a size fitting to the function to be tested.
Data types: Arithmetic1 works on ML images which can have different data types and value ranges (for example int8 with -128 to 127). A test that passes for int8 may fail with unsigned int16 or float, for example. Therefore Arithmetic1 functions should be tested with different data types, which can be done with iterative tests for each math function.
![[Note]](images/note.png) | Note |
|---|---|
Extended types like “vec3” will not be considered in this example test case. |
In the TestCaseManager, tab Test Selection, select “MyArithmetic1Test” and click Edit Files. The Python file MyArithmetic1Test.py opens in the integrated text editor MATE.
In the header, delete Screenshot and add Image instead, as well as the math import:
from mevis import *
from TestSupport import Base, Fields, Logging, Image
from TestSupport.Macros import *
from math import exp, log
As there will be only some differences between the tests for the math functions, we can use a single function for all iterative tests.
def ITERATIVETEST001_Absolute():
  """ -- Tests the Absolute function for all given data types. -- """
  testDict = {"int8": ("Absolute", "int8", (-10, 10))}
  return testDict, checkFunctions

def checkFunctions(function, dataType, (fillValue1, fillValue2)):
  """ -- Function for iterative tests to check
  correct fill values of result image. -- """
  Fields.setValue("TestPattern.dataType", dataType)
  Fields.setValue("TestPattern.fillValue2", fillValue2)
  Fields.setValue("TestPattern.fillValue", fillValue1)

  Fields.setValue("Arithmetic1.function", function)
Create a tuple with all available functions at the beginning of the test so that you can reference them. This way, you do not have to write the correct function name each time. In addition, this makes it easier to edit the test case if the names for the functions have been changed.
#all functions Arithmetic1 offers
FUNCTIONS = (
  "Absolute",
  "Invert",
  "Power",
  "Add",
  "Multiply",
  "Subtract",
  "Divide",
  "Or",
  "And",
  "Xor",
  "Log",
  "Exp"
)
Set the constant for those math functions that need it. It can either be fixed and the same for all tests, or dynamic with different constants for each test. To save work, we will implement the first option here, albeit with some adaption to the math function when necessary. Power and Multiply need a small constant to keep the results from becoming too large. For functions like Divide, however, the constant should not be too small or the result will be nearly zero each time.
  Fields.setValue("Arithmetic1.function", function)
  #Functions Power to Xor need a Constant
  #Function Power and Multiply need a small constant
  if function in FUNCTIONS[2:10]:
    constant = 2 if function in (FUNCTIONS[2], FUNCTIONS[4]) else max + 2
    Fields.setValue("Arithmetic1.constant", constant)
For Invert, the additional values Min and Max are needed.
  #Find min max value in both FillValues
  min, max = (fillValue1, fillValue2) if fillValue2 > fillValue1 \
  else (fillValue2, fillValue1)
Set the expected result for each math function. These can either be entered fixed for each test in the test dictionary or calculated in the test. For a module as easy as Arithmetic1, the second option is both less work and the better choice because you can test with different values without verifying your results each time. You only have to verify your calculation once.
Some special cases have to be taken into account. Zero division leads to an exception and has to be intercepted. For the natural logarithm, the input value cannot be <= 0. The bitwise operations And, Or and Xor work only for integer values, so we have to cast them.
  #Check calculation for two different voxel
  for x in (0, 1):
    imgVoxel = Image.getVoxelValue("TestPattern.output0", x, useStoredValue = True)[1]

    #Absolute
    if function == FUNCTIONS[0]:
      expected = abs(imgVoxel)
    #Invert
    elif function == FUNCTIONS[1]:
      expected = max + min - imgVoxel
    #Power
    elif function == FUNCTIONS[2]:
      expected = imgVoxel**constant
    #Add
    elif function == FUNCTIONS[3]:
      expected = imgVoxel + constant
    #Multiply
    elif function == FUNCTIONS[4]:
      expected = imgVoxel * constant
    #Subtract
    elif function == FUNCTIONS[5]:
      expected = constant - imgVoxel
    #Divide
    elif function == FUNCTIONS[6]:
      expected = constant / imgVoxel if imgVoxel else 0
    #Or
    elif function == FUNCTIONS[7]:
      expected = int(imgVoxel) | int(constant)
    #And
    elif function == FUNCTIONS[8]:
      expected = int(imgVoxel) & int(constant)
    #Xor
    elif function == FUNCTIONS[9]:
      expected = int(imgVoxel) ^ int(constant)
    #Log
    elif function == FUNCTIONS[10]:
      expected = log(imgVoxel) if imgVoxel > 0 else 0
    #Exp
    elif function == FUNCTIONS[11]:
      expected = exp(imgVoxel)

    #int results for integer data types
    if "int" in dataType:
      expected = int(expected)

    result = Image.getVoxelValue("Arithmetic1.output0", x, useStoredValue = True)[1]
    EXPECT_FLOAT_EQ(result, expected, \
    "Voxel (%d, 0, 0) does not have correct fill value."%(x), epsilon = 0.001)
To test the exponential function, use values from -4 to 4 so the result will fit even in the smallest data type int8.
#Large values makes no sense for Function Exp; values changed to max +-4
  if function in FUNCTIONS[11]:
    fillValue1 = getExpValues(fillValue1)
    fillValue2 = getExpValues(fillValue2)

  Fields.setValue("TestPattern.dataType", dataType)
  Fields.setValue("TestPattern.fillValue2", fillValue2)
  Fields.setValue("TestPattern.fillValue", fillValue1)

  ...

  def getExpValues(fv):
  """ -- Returns value that is useful for Exp function. -- """
  if fv > 4:
    return 4
  elif fv < -4:
    return -4
  else:
    return fv
To save work, create the tests once as dictionaries and use them in each iterative test.
#---Test dictionaries for iterative tests---
#Tests for integer data types
INTTYPES = {
  "int8":           (-10, 10),
  "int16":          (-100, 100),
  "int32":          (-1000, 1000),
  "int64":          (-100000, 100000),
  "unsigned int8":  (0, 15),
  "unsigned int16": (0, 150),
  "unsigned int32": (0, 1500),
  "unsigned int64": (0, 150000)
}
#Tests for floating point data types
FLOATTYPES = {
  "float":      (-0.25, 100.5),
  "double":     (-0.25, 1000.5),
  "long double":(-0.25, 1000.5)
}
Usually it is advisable to use values that are characteristic for the data type. For example, the range borders for integers (like int8: -128, 127) would be good test values. Unfortunately, Arithmetic1 does not promote the output data type if the result exceeds the data type range. Therefore, all values in this test case have to be chosen so that no result will exceed the range.
Example for an input type int8 (range: -128 to 127) with a resulting value of -130:
In case of the result being promoted, the result would be -130 and the output data type int16.
In case of the result not being promoted, the result would be 126 and the output data type int8.
At last, the iterative test functions have to added. They all will look similar to this test for Absolute:
def ITERATIVETEST001_Absolute():
  """ -- Tests the Absolute function for all given data types. -- """
  testDict = {}
  f = FUNCTIONS[0]

  for key in INTTYPES:
    testDict["IntDataType: " + key] = (f, key, INTTYPES[key])
  for key in FLOATTYPES:
    testDict["FloatDataType: " + key] = (f, key, FLOATTYPES[key])
return testDict, checkFunctions ![[Tip]](images/tip.png) | Tip |
|---|---|
For the full code, have a look at the “Arithmethic1Test” test case that is delivered with MeVisLab and available in the TestCaseManager. |
If you want to test with extended data types (for example vec3 or complexd), you have to make several adjustments:
Most of the time you will have to check each component of the data type (for example, vec3 has three components) because many operations will be executed component-wise.
Exceptions are of the data types complex and quaternion. These types are often calculated differently (for example vec2: "2 5" + 4 = "6 9"; complexd: "2 5" + 4 = "6 5").
Use Image.getVoxelValue("TestPattern.output0", x, useStoredValue = True)[0] instead of
Image.getVoxelValue("TestPattern.output0", x, useStoredValue = True)[1]. This will give you a string with all components of the voxel.
Otherwise you can use the TypeDecomposer module and grab the components from the different outputs.
You will not have to test every data type. If it works for vec5, it will probably work for vec64. A test with vec4 makes it safe to say that all sizes of that data type will work (or not).
In addition, some data types might make no sense to test for the function (for example data type stringuchar).
Fields that are changed during the test will be restored to the original value at the end of the test. Fields that have been changed indirectly will not be restored, for example, if you changed the fields by touching the Full Size button in SubImage module.
Be careful with the order in which the data type and fill values are set. The data type has to be set before the fill values; otherwise the values might not fit in the data type and might be translated.
Another problem based on the sequence might happen if you saved a larger data type and fill values in the network and then test a smaller data type. At the end of the test, the changed fields are restored in reverse order: the fill values will be restored before the data type, so the values will be translated to the smaller data type, thereby losing the original field value.
Some functionalities might work differently on 32 bit and 64 bit machines (for example, the image and page sizes of TestPattern have different limits on 32 bit and 64 bit). You can check the machine type with the MLAB class compilerInfo().
Long double will be defined as double on Windows machines, so when running tests for just one of them, you have to take the operating system into account.
Internal calculations often use double. Double has not sufficient precision to hold all int64 values so you have to be careful with very large values.
Python's floating point type is named float but has double precision like double in C++. If you need to get values with single precision, you can use the type c_float within the Python library “ctypes”. (Example: b = c_float(a).value).
© 2013 MeVis Medical Solutions AG
| |  | |
| 16.2. Developing a Test Case |  | Chapter 17. Operating Systems Details |