Introduction
MeVisLab supports Python for scripting using PythonQt (see http://pythonqt.sourceforge.net for details). See http://www.python.org for details on the language. For details on the mapping of datatypes from Qt to Python and vice versa, see the PythonQt website.
MeVisLab adds a module called "mevis" to the Python interpreter, which can be used to access MeVisLab's global MLAB, MLABFileDialog, MLABFileManager, ... objects.
For an example of Python usage in MeVisLab, have a look at the TestPython module in MeVisLab.
Python modules
MeVisLab comes with the complete Python standard modules. When you create MeVisLab MacroModules, you can implement your Python code by adding "source" tags to the "Commands" section.
We recommend that you only create one Python file per module and implement everthing else as Python modules/packages. To make your module aware of python modules that you have created, you can use the "importPath" tag. We recommend to put all related python modules and packages into one subdirectory and to add the to the importPath:
Then you can just do
to import your own Python modules in the script code of your MacroModule. You can as well add "importPath = $(LOCAL)" to the path to make everything in that directory available to the python import mechanism, but this might be confusing, because you could import the py file of your MacroModule by error.
Alternatively, you can place your Python modules/packages into the YourPackage/Modules/Scripts/python directory. This makes your modules/packages available to all MeVisLab modules that make use of python, since YourPackage/Modules/Scripts/python is added to the sys.path of the Python interpreter.
NumPy Module
MeVisLab is shipped with the NumPy library (see http://numpy.scipy.org/). NumPy's ndarray class is used to make ML subimages available to Python.
Python Image Processing
Starting with MeVisLab 2.1, MeVisLab allows to implement ML image processing modules in Python. For details, see Python Image Processing.
Python Qt Binding
Starting with MeVisLab 2.1, MeVisLab offers an (almost) complete binding to the Qt framework. For details, see Python Qt Binding.
Python Object Wrappers
Starting with MeVisLab 2.1, MeVisLab offers PythonQt wrappers to access C++ objects in Python scripting. For details, see Object Wrappers.
Python C-Extensions
MeVisLab supports adding user Python C-Extensions. The MeVisLab SDK ships the python include files and libraries to link against our python version. To link againt our Python version, add CONFIG += python to your profile. NOTE: Compiling your own C-Extensions might still cost some extra effort, since the c extensions do not follow the normal shared library naming convention (*.pyd on Windows, *.so on Linux/Mac OS X without a lib prefix). If you want to add your own C-Extensions, ask on the MeVisLab forum and you will get assistance. Starting with MeVisLab 2.1, Python C-Extensions can be located anywhere, so the best place is YourPackage/Modules/Scripts/python or a subdir of that directory (which is a package effectively).
Debugging
Starting with the MeVisLab 2.2 release, MATE (the text editor that comes with MeVisLab) features a built-in Python debugger which requires no additional setup. In addition to this, MeVisLab supports remote debugging of Python code. This has been tested with two publically available Python Remote Debuggers. The following describes how to configure MeVisLab for those debuggers:
Winpdb
Winpdb is a nice open-source cross-plattform Python debugger. The following describes how to use it to debug Python code inside of MeVisLab. It is recommended if you only need a debugger and not a complete programming environment for Python.
Installation
- Install Python 2.7 (http://www.python.org/)
- Install wxPython for Python 2.7 (http://www.wxpython.org/)
- Install Winpdb (http://winpdb.org/download/)
- Run MeVisLab and open the Preferences (CTRL-P) – Go to section "Python" – add the following Python code to "Python Debugger Code" (change the path to the place where you installed Python)
Running the Debugger
On the MeVisLab side:
- Run MeVisLab and open/create the module that you want to debug
- Go to the context menu of that module and select "Attach Python Remote Debugger" (this will only be shown if the module contains a python file and if you have done the above installation)
- MeVisLab will freeze and wait for the debugger
On the Debugger side:
- Run the "winpdb" script (located in your Python installation, e.g. at C:\Python27\Scripts)
- Go to "File->Attach"
- Enter password "mevis"
- Connect to the displayed MeVisLab script that should appear
- Choose "Go" to let MeVisLab continue it's execution
Now you are done and can set breakpoints in any MeVisLab module that uses Python. You can also call "Attach Python Remote Debugger" on another module in MeVisLab, which will open that file in the already connected debugger.
PyDev / Eclipse
PyDev is an open source Python development enviroment for Eclipse (http://pydev.org/index.html), and it not only features a Python remote debugger but it also enables code completion, customizable syntax highlighting, inline code analysis and some refactoring features. Eclipse on the other hand is an open source IDE for which there exist a lot of plugins, e.g. other programming languages or SDKs, version control, modeling, databases etc.
Installation
- Make sure you have a Java JRE or Java SDK installed
- Download Eclipse (http://www.eclipse.org/downloads), if you do not know which one to take, take the default: 'Classic' and use 64 bit versions of Eclipse and Java
- Unzip the download file and move the folder to your program folder (no further installation required)
- Run Eclipse
- Go to "Help->Install New Software...", select "Add..." and add the Pydev site (Name: Pydev, Location: http://pydev.org/updates)
- Select the "PyDev" checkbox (for MeVisLab, you do not need the Mylyn Integration)
- Click on "Next" and "Finish", respectively, in order to complete installation
- After Eclipse restart you should be able to switch to Pydev perspective (Window > Open Perspective > Other...)
- Configure the python interpreter
- Go to "Window > Preferences > Pydev > Interpreter - Python", and click on "New..."
- Select "Auto config" or browse for your python installation, select OK, confirm the defaults and close the Preferences window
- Configure Eclipse and Pydev editors
- Open "Preferences" (Windows: "Window > Preferences", Mac OS X: "Eclipse > Preferences")
- Go to "Preferences > General > Editors > Text Editors"
- Set "Displayed tab width" to 2 (or 4) and make sure "Insert spaces for tabs" is checked
- Go to "Preferences > Pydev > Editor"
- Set "Tab length" to 2 (or 4) and make sure "Replace tabs with spaces..." is checked
- Run MeVisLab and open the Preferences (CTRL-P)
- Go to section "Python"
- add the following Python code to "Python Debugger Code" (adapt the path and version number to the place where you installed Eclipse and PyDev – use '\' instead of '/')
import syssys.path.append("C:\\Programme\\eclipse\\plugins\\org.python.pydev_2.7.1.2012100913\\pysrc")import pydevdpydevd.settrace()
Creating a Pydev project for your existing MeVisLab scripts
- Run Eclipse and open the Pydev perspective
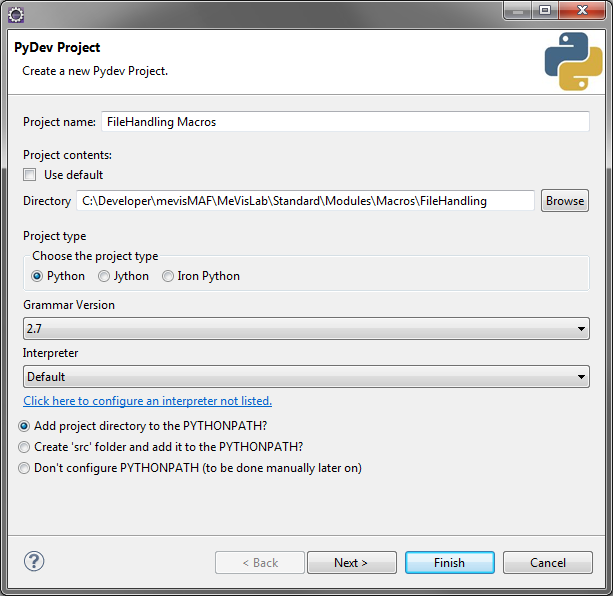
- Go to "File > New > Pydev Project"
- Project Name: e.g. "MyProject"
- Project contents:
- Uncheck 'Use default'
- Browse to your MeVisLab module directory where the python scripts are and select this directory
- Project type: Python
- Grammar version: 2.7
- Select option "Add project directory to the PYTHONPATH"
- "Finish"
Adding other folders and resources to PYTHONPATH
There are two possible ways to add other libraries for code completion / inline syntax check:
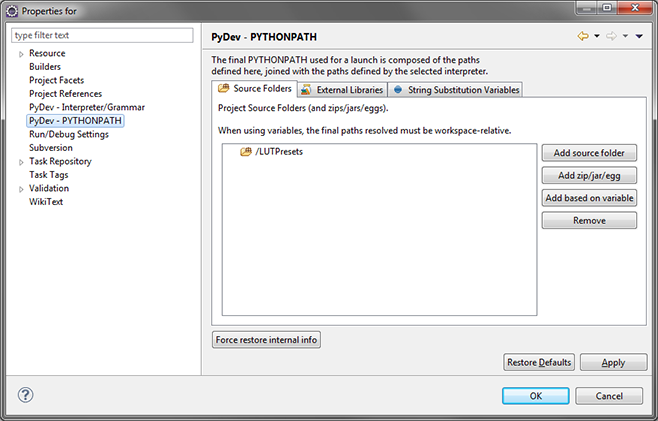
- Per project:
- Right click on your project in "Pydev Package Explorer"
- Select "Properties", Go to "PyDev - PYTHONPATH"
- Add folders others than your project folder as "Source folders"
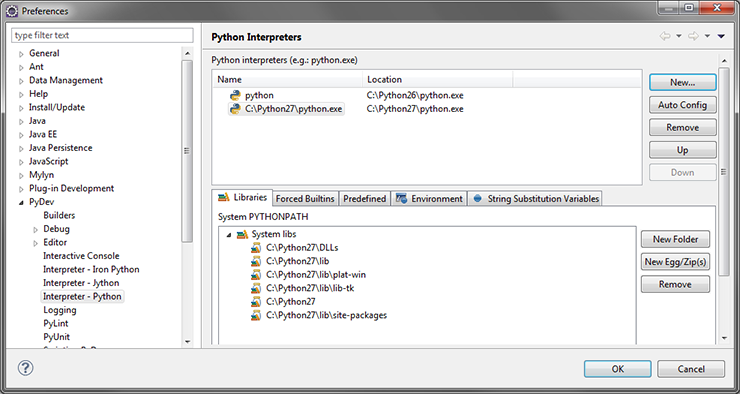
- Per interpreter:
- Open "Preferences" (Windows: "Window > Preferences", Mac OS X: "Eclipse > Preferences")
- Go to "PyDev > Interpreter - Python"
- For "Libraries" press "New folder" and add the folder containing other Python module
- From then on you will be able to use code completion and error highlighting based on included libraries
- HINT: On each startup MeVisLab generates one big file (MeVisLabPythonStubs.py) with Python class stubs for all Scripting interface (MLAB*). It is usually imported using from mevis import * and Pydev is not able to resolve that API. But if you rename that stub file to mevis.py and if you add the folder that contains it to interpreter's PYTHONPATH (as described above) then Pydev will also enable code completion and syntax check for the MLAB* interface.
- Windows: %APPDATA%%/MeVisLab/MeVisLabPythonStubs.py
- Linux: ~/.local/share/MeVis/MeVisLab/MeVisLabPythonStubs.py
- Mac OS X: ~/Library/Application Support/MeVisLab/MeVisLabPythonStubs.py
Running the Debugger
On the Debugger side:
- Run Eclipse
- Change to the Debug Perspective ("Window" > "Open Perspective" > "Other..." > "Debug")
- Run the PyDev Extensions Debug Server (http://pydev.org/manual_adv_remote_debugger.html)
On the MeVisLab side:
- Run MeVisLab and open/create the module that you want to debug
- Go to the context menu of that module and select "Attach Python Remote Debugger" (this will only be shown if the module contains a python file and if you have done the above installation)
- MeVisLab will freeze and wait for the debugger
Now you are done and can set breakpoints in any MeVisLab module that uses Python. You can also call "Attach Python Remote Debugger" on another module in MeVisLab, which will open that file in the already connected debugger. The debugger remains attached to the modules until MeVisLab is closed (so you do not need to restart the debugger after you recreated your module, for example).