| 3.9. Using Groups | ||
|---|---|---|
 | Chapter 3. Modules and Networks |  |
| 3.9. Using Groups | ||
|---|---|---|
| | Chapter 3. Modules and Networks | |
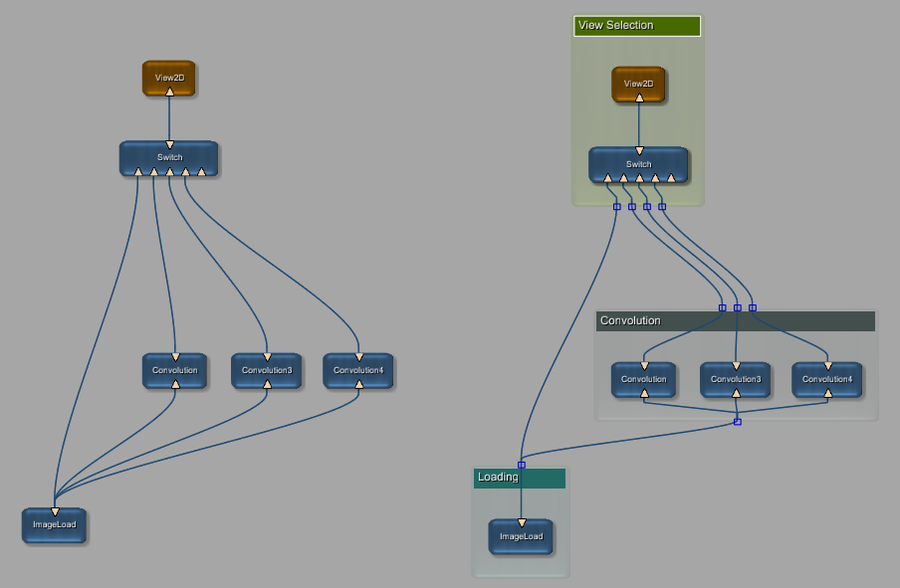
Modules can be grouped. A group is helpful for organizing the network in the workspace, as the group can be moved as one unit. The default color of groups can be set in the Preferences, see Section 4.3.7, “Preferences — Network Appearance”.
Data connections are bundled optically as square, color-coded connectors at the bottom (input) or top (output) of the group. The colors correspond to the connection types: blue for ML, green for Open Inventor, brown for base. Parameter connections are not bundled for groups.
The size of the group is set automatically by the bounding box of the modules and cannot be changed explicitly. To adjust it, move the modules within the group.
![[Note]](images/note.png) | Note |
|---|---|
Besides the optical appearance as “group”, the modules are not connected to each other in any special way. Groups are only a visual tool for improving the network handling. Consequently, the group feature should not be used excessively to organize complex networks; for this, groups should be converted to macros which are the recommended way to reduce complexity in the MeVisLab context, see Section 3.9.2, “Editing, Converting and Deleting Groups”. |
The group name and color of a group can be scripted, see the Scripting Reference, MLABNetworkModelItemGroup.
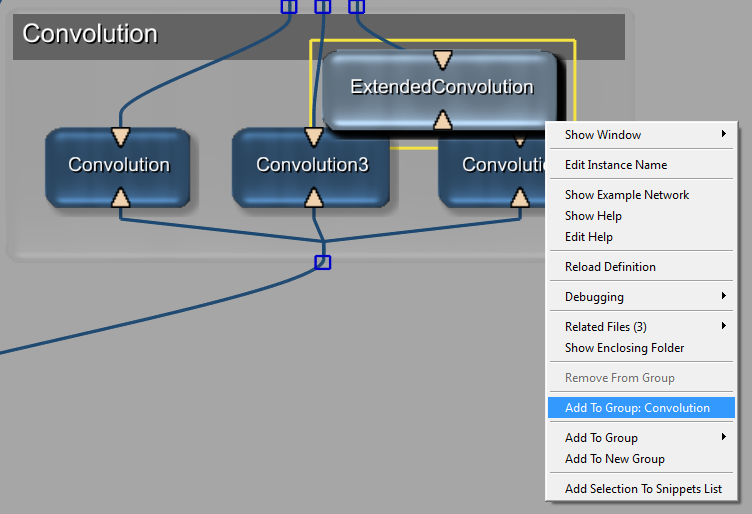
Creating groups and adding to/removing modules from groups is done via the context menu of the selected module(s).
The additional option Add to Group: <TargetGroup> is available when the module is already positioned within the target group's bounding box.
| Note |
|---|---|
The color of modules that are placed over a group but that are not part of any group is rendered slightly more saturated and bright. |
Remove from Group
Removes the selected modules from the group.
![[Tip]](images/tip.png) | Tip |
|---|---|
To move modules from one group to another, simply select them and add them to another or a new group. Since modules can only be part of one group, this course of action will effectively move the modules. |
Add to Group
Adds the selected modules to one of the existing groups, which can be selected in the submenu.
Add to New Group
Creates a new group for the selected modules. Also allows adding the modules to an existing group.
A group can be edited, converted to macro, or deleted via the context menu of its title.
Edit Title
Allows editing a new group title/name. The title must be unique within the current network.
| Tip |
|---|---|
Refer to chapter Section 25.3, “Module and Network Handling — Shortcuts and Tricks (All Platforms)” for a shortcut for editing a group's title. |
Edit Color
Allows editing the color of the group. This has no effect on the default color which is set in the Preferences, see Section 4.3.7, “Preferences — Network Appearance”.
| Note |
|---|---|
When changing the color setting, the alpha value is 255 by default, that means the group is opaque. To give the group the appearance of standard groups, enter the original alpha value of 38. |
Convert To Macro
Creates a (local) macro from the group, see Section 4.1.11, “Create Local Macro”. The network has to be saved for this.
Delete Group
Deletes the group. Can be undone/redone.
For copying a complete group:
Double-click the group title bar to select all modules of the group.
Duplicate the group via the Edit menu or the respective keyboard shortcuts (on Windows/Linux(KDE): CTRL+D; on Mac OS X:  +D).
+D).
A number is added automatically to the title of the group copy, for example “title2”, “title3”, etc.
© 2013 MeVis Medical Solutions AG
| |  | |
| 3.8. Network Handling |  | 3.10. Using Notes |