| Chapter 10. Developing a Macro Module for an Applicator | ||
|---|---|---|
 |  | |
| Chapter 10. Developing a Macro Module for an Applicator | ||
|---|---|---|
| | | |
Table of Contents
In the following sections, we will create a macro module based on the applicator we have built in the Open Inventor example chapter, adding fields and scripting for dynamic control of length and diameter of the applicator.
If you have not followed our tutorial, please open the
ApplicatorExample.mlab demo (available via Help → Welcome) and start from there.
As we already have the modules for our macro, it is easiest to create a new local macro from them first and then promote the local macro to a global macro in the creation process.
For a start, open a new network tab (File → New or a keyboard shortcut) and copy and paste the applicator modules (Edit → Copy, Edit → Paste or the respective keyboard shortcuts) to the new network.
![[Tip]](images/tip.png) | Tip |
|---|---|
You can select the Applicator group with a double-click on its title bar and just copy the group. |
For the creation of a local macro, the network needs to be saved first. Select File → Save and save the network under any name (it is of no consequences for the macro).
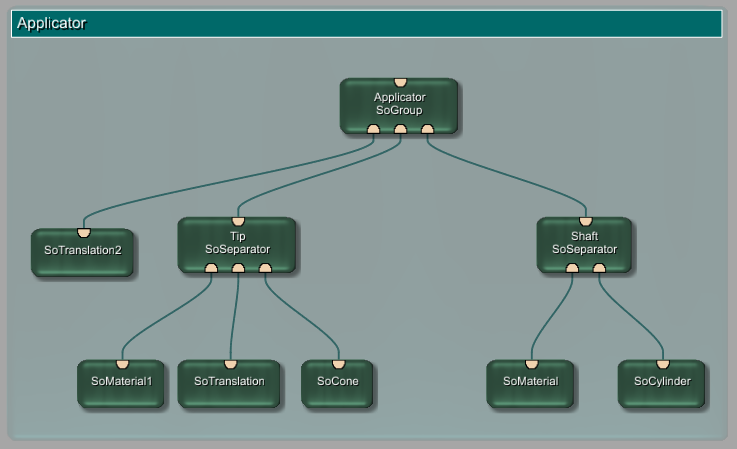
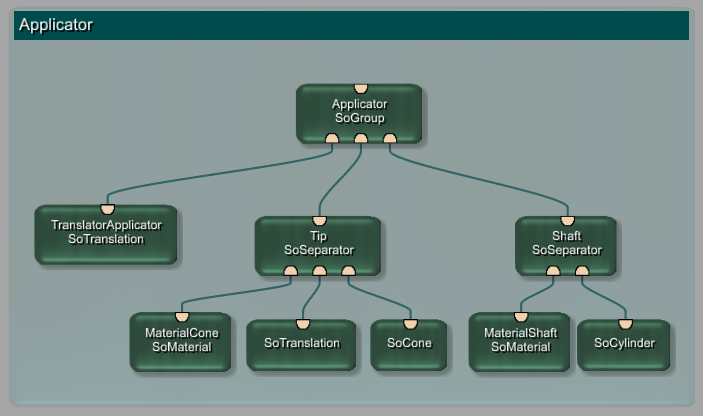
Clean the automatic instance names of the modules — as they will be used for a new macro, there is no need to have names like “SoTranslation2”. Remove all numbers and write all module instance names starting with capital letters (if you want to) by right-clicking the module and selecting Edit Instance Name from the context menu.
In our example, this is the resulting network:
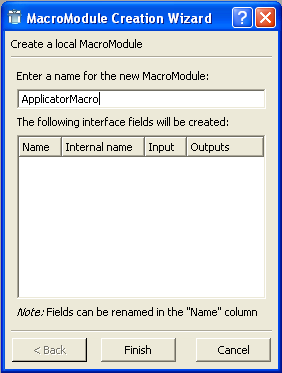
Select all modules with a double-click on the Applicator group title bar and then select File → Create Local Macro. (Only the selected modules will be added to the macro; the group structure itself will be skipped.)
The dialog for the local macro opens. Enter the module name
ApplicatorMacro and click
Finish.
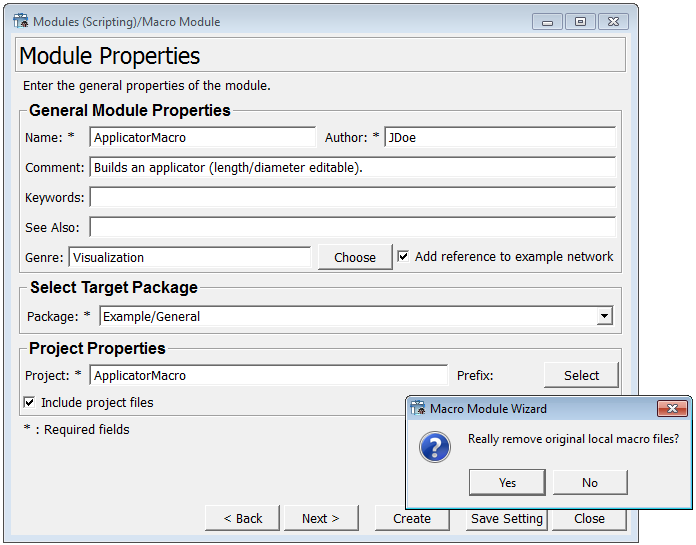
In the next dialog, select Yes to promote the macro to a global macro. The Macro Module Wizard starts.
Enter the properties for your new module.
Name:
The name as entered above is displayed, for example ApplicatorMacro. You can edit the name
here. The module name has to be unique within the MeVisLab module
database (including the SDK module database). Therefore, you may
need to change the module name slightly in case of a
collision.
Author
Enter your name or initials. The author entry is mandatory and will be used in module searches.
Comment
Enter a short description for the module. The comment entry is mandatory.
Keywords
The optional keywords should be the terms other users might search for, e.g., “applicator” in this case.
See Also
The optional See Also entries should list other, related modules that might be of interest for a user.
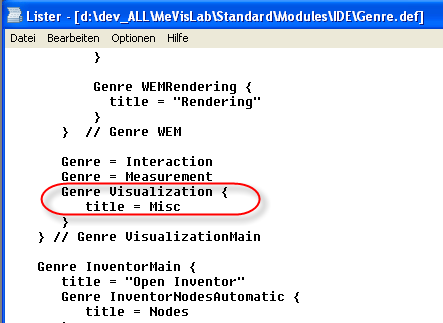
Genre
Enter the genre. Genre entries are mandatory; they defines the place of the module in the Modules menu and the Module Browser. For suggestions, check out similar modules in the database.
| Tip |
|---|---|
To find a fitting genre, you might have a look at the
The genres are not carved in stone but developed over time, so there might be more than one fitting choice for your module. You may even want to add a new genre in Genre.def or define an own user
genre. |
Add reference to example network:
Each module should be completed by an example network to
explain its function and usage in an exemplary application. Check
to create an empty example network
ExampleModuleName.mlab which may be edited
later (optional).
Project:
User defined modules are grouped in projects. Enter a new
project name here: “ApplicatorMacro”. The module will
be installed in the Project Path in the
subdirectory ProjectName.
Target Package:
Select a Target Package from the list, for this example “Example/General” as created in Section 8.2, “Creating a User Package for Your Project”.
![[Note]](images/note.png) | Note |
|---|---|
Only existing Target Packages can be selected; if you want to use a new one, you have to create it before creating the module. |
Click Next.
Click Create. You are asked whether the original local macro files should be removed. Accept with OK, because the local macro files are obsolete with the promotion to global.
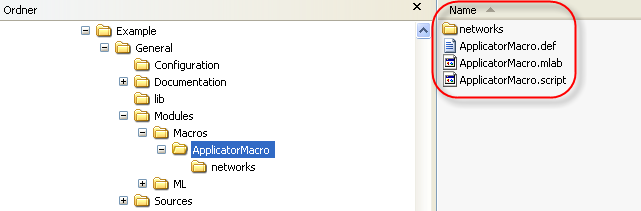
Now that the macro module and its necessary files are created,
the file browser (depending on your system) will open and display the
folders and files. In our example, we have a package group
“Example” with the package “General” and in
the folder Modules/Macros the new ApplicatorMacro with the files
.def: module definition file, for
registering the module(s) to the MeVisLab module database.
.mlab: network file which includes the
modules and their settings.
.script: MDL script file for the panel
and from which other scripts (Python or JavaScript) may get
called.
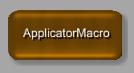
On the workspace, the previously visible network is now displayed as one macro module.
To display the internal network on a second tab, right-click the module and select Show Internal Network from the context menu. Alternatively, you can hold Shift and double-click the macro module.
© 2013 MeVis Medical Solutions AG
| | | |
| Chapter 9. Introduction to Macro Modules |  | 10.2. Adding the Macro Parameters and Panel |